How To...
This tutorial will show you how to create a unit in the RDXEngine.
This sample unit will be controlled by the player for testing purposes.
First off you should take note of the different directories inside the main folder of the game.
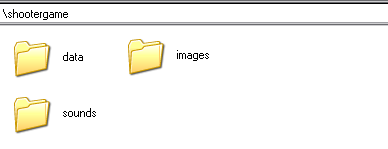
data folder - This folder contains all information pertaining to an object.
sounds folder - This folder contains all the sounds that will be played.
images folder - All images placed inside this folder will be loaded into the game.
For now, let's go into the images folder and start to shape what our guy will look like.
Your window could look something like this.
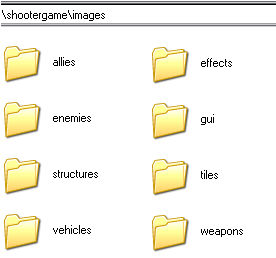
As a matter of fact your window doesn't have to look like this.
The only folder that actually needs to be in this directory is the 'tiles' folder.
With that being said let's get organized by creating a folder called 'player' in the current directory.
Now it's time to open up your favorite art program and create something.
As of 4/19/04 there are currently 4 different image files that the engine looks for when defining an object.
They Include: A standing image, a moving image, a firing image, and a dying image.
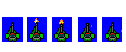
With your image editor still open (duh), draw a cool image of what your player will look like at rest.
Here is mine...

I'm not a good artist so I got a friend to make me this.
Notice how there is blue around the guy instead of a white or transparent. This blue is pure (255) blue.
You will need to have all the unused space by your player painted with this blue because it tells the engine not to draw it.
Also note that the player is facing north (up). If you do not make your player face this direction your player will not be looking at what your aiming at in game.
Instead of having to draw each frame for 360 degrees the engine will load this single image and rotate it for you! =)
Currently, my guy is 20x20 pixels but you can make it whatever you want.
Keep the image dimensions in the back of your mind though because later you'll need this info.
I chose to leave this particular image a single frame of animation for this example.
If you want to make the player look around when they aren't moving then come back to this part in a few steps.
For now, save your image in the 'images\player' folder that you created.
Next you'll need to create a firing animation.
This is a little trickier because you're probably going to have to make an animation out of it.
To do this you, draw each each frame of the animation in a seperate square.
Each square has to have EXACTLY the same width and height.
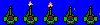
Here is what my guy looks like...
I chose a 20x25 image this time. I'll say it again, don't forget what the dimensions are because it will be crucial later.
Right now this image is unacceptable for the engine because it is not compacted into a single row.
To make it acceptable, just line all the blue boxes in the order you want the animation to play starting at the top left corner of the image.
It should look something like this now...
Now save this image in the 'images\player' directory as well.
The images for death and walking are created exactly like the fire animation.
Now that you have all the animations are created for your character, you now need a way to tell the engine how to play them.
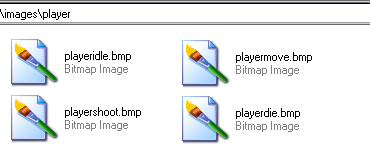
Browse to the 'images\player' folder. It should look similar to this...
For each image file you will need to create a GAF file (GAME ANIMATION FILE).
For example, if you have an animation called playeridle.bmp, then you will need to create a new text document called playeridle.gaf in the same folder.
Paste the following lines into this newly created GAF file.
WIDTH:0
HEIGHT:0
NUMFRAMES:0
DELAY:0
XOFFSET:0
YOFFSET:0
SOUND:none
PLAYONFRAME:0
NOTE: There are no spaces between the colons(:) and the actual number. Putting spaces may produce undesirable effects.
It doesn't matter what order you have these parameters in or if there are spaces in between them but if you do leave a line out it will default to 0.
Also, any text typed on a line that isnt one of these parameters is ignored. (Usefull for comments)
Remember when I told you to memorize the dimensions of each animation? Now you need to fill in the width and height of each animation.
NUMFRAMES is the the number of frames that the animation has. As of 4/23/04 you will need to put the number of frames minus one here. (Do not count the first frame as 1)
DELAY is the time interval between each frame of animation. Entering 1000 as the value gives a duration of 1 second between each frame.
XOFFSET and YOFFSET are values that you enter if your particular animation is different from the width and height of your actual object.
SOUND is a filepath to a soundfile. i.e. sounds\fire.wav
PLAYONFRAME is the frame that the soundfile will play on.
As a quick example, I will show and explain my playerfire.gaf file.
WIDTH:20
HEIGHT:25
NUMFRAMES:4
DELAY:50
XOFFSET:0
YOFFSET:5
SOUND:sounds\fire.wav
PLAYONFRAME:1
My normal player's width and height is 20x20. This particular animation is 20x25. So I set the width to 20 and the height to 25.
There are 4 frames of animation not counting the first frame so I put 4.
I wanted this to be a quick playing animation so I set the delay to 50 which is equivalant to 1/20th of a second.
Now because my fire animation is bigger than my actual player, I need to enter an offset.
To do this you just subtract your current animation dimension from the base dimension.
In this case it would be 20 - 20 = 0 for the width and 25 - 20 = 5 for the height.
This ensures that your player will be drawn correctly when switching between different animations.
I created a small gun fire sound and placed it in the sounds folder and named it fire.wav.
I set the sound parameter to the path and PLAYONFRAME to 1 because the muzzle flash is drawn on frame 1. (a value of 0 makes it play instantly)
Now that you know how to set up an animation, go ahead and create GAF files for each of your animations and set their values accordingly.
After all that is completed you'll get to actually define the parameters of the player.
Browse to your '\data' folder this time instead of images.
Create a folder called player or something that will help catagorize your objects.
Now create a new text document in this folder called 'player.gof'. This GOF file (GAME OBJECT FILE) will hold data similar to the GAF file.
A typical player GOF file looks like this...
CLASSTYPE:human
NAME:player
HEALTH:50
MAXHEALTH:50
WIDTH:20
HEIGHT:20
MOVEPERPIXEL:1
MASS:16
WEAPON:data\weapons\autorifle.txt
PROJECTILENAME:bullet
ISPROJECTILE:false
CANMOVE:true
BLOCKING:true
BLOCKSPROJECTILES:true
ANIMIDLE:images\guy.bmp
ANIMMOVE:images\guywalk.bmp
ANIMDEATH:images\guy.bmp
ANIMFIRE:images\guyfire.bmp
Most of the parameters are self explanatory.
One important thing to note is that CLASSTYPE is ALWAYS first when defining a GOF.
The width and height are the actual bounding box around the player. It has nothing to do with the animations.
MOVEPERPIXEL is a force amount that is applied to the object when it attempts to move.
MASS also controls how fast the object moves. The higher the mass the more MOVEPERPIXEL needs to be applied to accommodate.
Changing the mass and moveperpixel values allows for fine tuning speeds of every object.
WEAPON is a path to a file (currently .txt) that contains information about the objects weapon. Explained later.
PROJECTILENAME is the name of the projectile that the player fires. This is not the name of the GOF file for the projectile but the actual defined name.
ISPROJECTILE tells the engine it's a projectile. Im working on removing this parameter because classname already defines the type of object.
CANMOVE allows the object to be moved. (force can be applied to it)
BLOCKING, when set to true, means that other objects can NOT be in the same location of this object.
BLOCKSPROJECTILES, when set to false, means bullets can pass through this object. This is handy for creating tables and counters where players cant move through but can shoot over.
ANIMIDLE, ANIMMOVE, ANIMDEATH, and ANIMFIRE are all image locations to your created player.
Set your values according to how you want your player to behave. Make sure that the pathnames to the animations are correct otherwise the engine will substitute one in.
Now create a .txt file in some folder in your data directory and name it appropriately.
I chose 'data\weapons\autorifle.txt' for my example.
This file contains...
NAME:autorifle
AMMO:200
MAXAMMO:200
RELOADTIME:3000
FIRERATE:300
UNLAMMO:true
AMMONAME:data\projectiles\bullet.gof
Again, most of these parameters are self explanatory.
Just remember when setting FIRERATE and RELOADTIME that 1000 equals 1 second.
AMMONAME is the path to a GOF file that contains information about the projectile. (Explained Next)
With your spiffy new gun created, you'll need a projectile to shoot out of it right?
Create a GOF file in 'data\projectiles\' or wherever useful for you.
This GOF file should look slightly different from the player GOF file.
Here is my bullet.gof file...
CLASSTYPE:projectile
NAME:bullet
HEALTH:10
MAXHEALTH:10
WIDTH:2
HEIGHT:2
MASS:2
ACCURACY:10
MOVEPERPIXEL:1
DURATION:1900
DAMAGE:10
EFFECTNAME:explosionsmall
HASDURATION:true
ISPROJECTILE:true
CANMOVE:false
BLOCKING:false
ANIMIDLE:images\weapons\ar_bullet.bmp
ANIMMOVE:none
ANIMDEATH:none
ANIMFIRE:none
Remember the PROJECTILENAME parameter from the player GOF file? That name has to correspond with the NAME parameter that you define.
HEALTH can be set so this object can be shot down. (Great for creating slow moving rockets that can be destroyed during flight.)
ACCURACY is the variation in degrees from a shot to the crosshair. i.e. an accuracy set to 10 will randomly shoot the projectile plus or minus 10 degrees from its target. A value of zero gives the weapon perfect accuracy.
DAMAGE is the amount of damage done to an object it strikes. Depending on the behavior of the object, more, less, or no damage can be taken.
EFFECTNAME is an object name for an effect GOF. Effect GOF's will not be explained in this tutorial. (used for rocket splash damage, healing, etc...)
HASDURATION and DURATION work together to define if and how long the object will last from creation.
If you don't want your bullet to fly clear across the map then set this to a reasonable number defined by the speed. (1000 = 1 sec)
ANIM* parameters are the imagepaths to the images to be displayed. These image files can also be animations. i.e. rockets can be animated.
With all files created correctly you should now be able to launch the game and have your newly created object behave how you defined.
This concludes the tutorial. If you have any questions, feel free to email me